![]()
Manuals:
Handleiding Standaard Rail Montage:
Dutch:
English:
French:
German:
Manual Wave Parts:
Instructions for connection and operation
Pairing the Remote Control with the Motor:
1. Slide down the back cover of the remote control.
2. Insert the batteries.
3. Houd de “Set” knop 3 seconden ingedrukt totdat het lampje aan blijft
Voor de Matter motor Geleverd voor November 2025: Druk één keer op de “Set”-knop van de motor.
4. Druk direct daarna op de “P2”-knop aan de achterkant van de afstandsbediening.
The remote control is now successfully paired with the motor.
Putting motor into Zigbee pairing mode: (Zigbee Version only)
Press the “Set” button four times. On the fourth time, press and hold the button until the light blinks. The motor is now in Zigbee pairing mode and ready to be paired with a hub or controller.
Motor in Matter koppelmodus zetten: (Alleen Matter Versie)
Druk drie keer op de “Set”-knop. Houd bij de vierde keer de knop ingedrukt totdat het lampje gaat knipperen. De motor bevindt zich nu in Matter pairing modus en is klaar om gekoppeld te worden met een hub of controller.
Changing the direction of rotation of the motor (Reversing open and close):
Press the “Set” button twice. Press and hold the button the second time until the motor responds (By a short movement). The direction of rotation of the motor is now reversed.
Voor de Matter Motor Geleverd voor November 2025:
Press the “Set” button 5 times in a row
Motor Reset:
Press and hold the “Set” button until the light comes on release the “Set” button and then press the “Set” button again until the light blinks and goes out.
Als u de Zigbee/Matter verbinding ook wilt resetten voer ook de volgende actie uit:
Press the “Set” button four times. On the fourth time, press and hold the button until the light blinks.
Voor de Matter motor Geleverd voor November 2025:
Press and hold the “Set” button until the light flashes 5 times.
Gordijn positie Resetten:
Press and hold the “Set” button until the light comes on release the “Set” button and then press the “Set” button again until the light blinks and goes out.
Open and close your curtain now; the new position will be saved automatically.
RJ9 connection(4P4C) – external control via switch or relay
This curtain motor is equipped with an RJ9 port (4P4C) that allows you to optionally connect a wall push button, switch or relay for wired control in addition to wireless control.
The gate supports potential-free switching (dry contact) – that is, you only connect a switching contact, without supplying voltage.
Use an RJ9 plug (4P4C) to connect the following functions:
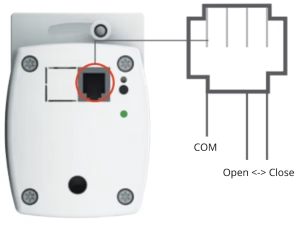
⚠️ Important:
– Use only potential-free (de-energized) switches or relays
– Do not apply voltage to this port
Using Zigbee Motor in Home Assistant (ZHA)
Some Zigbee products, such as our curtain motor, use a modified way of communicating. As a result, Home Assistant (ZHA) does not automatically recognize them correctly. With a so-called custom “quirk,” we solve this.
1. With File Editor (Add-on) Create a folder named /custom_zha_quirks/ in the homeassistant/ or config/ folder.
2. Open the configuration.yaml file and add (or modify) the following line:
zha:
  custom_quirks_path: /config/custom_zha_quirks
3. In the custom_zha_quirks folder, create a new file named _TZE204_r0jdjrvi.py
4. Download Quirk file and copy all contents into the new file just created in the custom_zha_quirks folder
5. Save and restart Home Assistant.
